
ECE Movement Curriculum · Preschool & Kindergarten

12 Preschool Obstacle Course Ideas: Continuous-Flow Gross Motor Circuits

Use these 12 illustrated obstacle-course layouts to plan jumping, crawling, balancing, walking, and throwing stations while reducing long waits and keeping traffic patterns clear.

ADVERTISEMENT

Quick Teacher Guide: Obstacle Circuits in Preschool

Keep this checklist in mind when setting up any of the 12 obstacle courses below:

Developmental Readiness

Preschool & Pre-K. Adjust step height, distance, pathway width, and station complexity to the children currently using the course.

Continuous-Flow Design

Use a simple one-way loop and let children enter only when the next station is clear. The goal is to reduce long waits, not to keep every child moving at all times.

Active Supervision

Position trained adults at higher-support stations such as low beams, tumbling mats, or step platforms, following your program and equipment safety requirements.

Traffic Spacing

Stagger entries and use visible waiting spots so children do not crowd the same station or cross into another child's landing or travel path.

Illustrated Course Layouts

12 Preschool Obstacle Course Ideas

Browse the layouts below. Each card gives a short route description beside the diagram. Expand Teacher Notes for setup, safety guidance, and ways to simplify or extend the course.
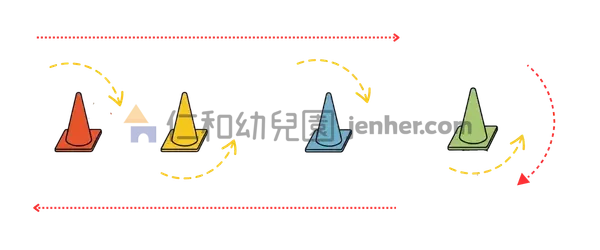
Activity 22-1: Cone Weaving Course

Cone Weaving Course

Walk or jog in an S-shaped path around the cones, then follow the separate outside return lane back to the start.

Teacher Notes: Setup, Safety & Variations
Equipment: 5–8 lightweight traffic cones or soft floor markers
Setup: Place cones in a line with enough spacing for children to turn without bumping them; mark a separate return path.
Safety: Keep the travel and return paths clearly separated and slow the activity to walking if children begin crowding or crossing lanes.
Make It Easier: Walk around 4 widely spaced cones.
Make It Harder: Add a second movement pattern such as side-stepping between selected cones while maintaining the same route.
Teacher Cue: "Eyes up, curve around each cone, and stay on your own path."
Activity 22-2 original rope-gate diagram adapted to soft hurdles and an open crawl station

Low Hurdle & Crawl Course

Step or jump over low soft obstacles, crawl through a separate open tunnel or gate, and continue along the one-way route.

Teacher Notes: Setup, Safety & Variations
Equipment: 2–4 low foam hurdles, pool noodles resting loosely on supports, or flat floor lines · 1 stable crawl tunnel or open foam gate
Setup: Separate the jump/step-over station from the crawl station so one obstacle is not serving as both a tensioned hurdle and a tunnel.
Safety: Do not stretch elastic cords across a preschool travel lane. Use soft obstacles that fall away easily or flat floor markers, and follow the equipment manufacturer's age and setup instructions.
Make It Easier: Step over a flat tape line and crawl through a wide stationary tunnel.
Make It Harder: Alternate a controlled two-foot jump over a low foam hurdle with a hands-and-knees crawl through the next station.
Teacher Cue: "Soft jump over, hands and knees through, then follow the path."
Activity 22-3 original horizontal-cone hurdle diagram adapted to low soft markers

Low Step-Over Line Course

Travel down the lane by stepping or making small two-foot jumps over low, soft markers placed across the path.

Teacher Notes: Setup, Safety & Variations
Equipment: 4–6 flat floor lines, foam strips, or purpose-built low soft hurdles
Setup: Space markers far enough apart for a child to regain balance before the next one.
Safety: Avoid improvised rigid or rolling hurdles. Use equipment intended to stay stable or release safely when contacted.
Make It Easier: Walk over each floor line one foot at a time.
Make It Harder: Use small two-foot jumps over every other marker with a stabilizing step between jumps.
Teacher Cue: "Step or jump, find your balance, then move to the next line."
Activity 22-4 original horizontal-cone row adapted to flat floor markers

Parallel Floor-Marker Jump Course

Move across a short row of flat markers using controlled two-foot jumps or step-overs, pausing when needed to regain balance.

Teacher Notes: Setup, Safety & Variations
Equipment: 6–8 flat vinyl strips, agility rings, tape lines, or low foam hurdles
Setup: Create a short lane with generous spacing and a clear stopping area after the final marker.
Safety: Keep the number of consecutive jumps appropriate for the group and stop the turn if a child loses control or enters another child's landing space.
Make It Easier: Step over the markers or jump only every second marker.
Make It Harder: Add a brief one-count pause after each two-foot landing before the next jump.
Teacher Cue: "Jump, land quietly, find your balance, and go again when you are ready."
Activity 22-5: Weave-and-Toss Target Course

Weave-and-Toss Target Course

Weave around the cones, stop at the throwing mark, make a gentle underhand toss into an open target, and follow the return route.

Teacher Notes: Setup, Safety & Variations
Equipment: 4–5 cones · 1 open target tub or hamper · Soft beanbags or foam balls
Setup: Place the target away from the return path and use a clearly marked throwing spot.
Safety: Aim the tossing station away from passing children and pause the station before anyone retrieves missed objects.
Make It Easier: Move the target closer and use a larger open container.
Make It Harder: Offer two colored targets and let the child choose or respond to a color cue before tossing.
Teacher Cue: "Stop at the line, look at the basket, and make a gentle underhand toss."
Activity 22-6: Two-Lane Target Course

Two-Lane Target Course

Travel down your assigned lane, make an underhand toss at the target station, and return by the marked outer path without crossing into the neighboring lane.

Teacher Notes: Setup, Safety & Variations
Equipment: Cones or floor markers · 2 target tubs · Soft beanbags or foam balls
Setup: Create two clearly separated lanes with their own throwing and return areas.
Safety: Keep a visible divider between lanes and use walking or jogging only when each child can remain in their assigned route.
Make It Easier: Walk the route without a throwing station until children understand the lane pattern.
Make It Harder: Add a short floor-tape balance walk before the throwing spot.
Teacher Cue: "Stay in your lane, stop at your target, and follow your own way back."
Activity 22-7: Figure-Eight Walking Course

Figure-Eight Walking Course

Follow a large figure-eight path around two cone circles and walk through the center crossing only when it is clear.

Teacher Notes: Setup, Safety & Variations
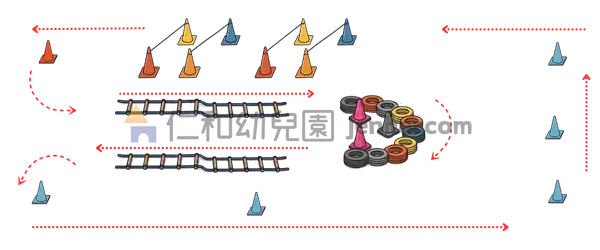
Equipment: 6–8 cones · Floor tape for the center crossing
Setup: Make the two loops large enough that the center crossing is easy to see before entering it.
Safety: Use a walk-through-only rule at the center crossing and limit the number of children on the route if yielding becomes confusing.
Make It Easier: Add floor arrows and send one child through the course at a time.
Make It Harder: Use marching or tiptoe walking on the outer loops while keeping the center crossing at a regular walking pace.
Teacher Cue: "Follow the arrows and check the crossing before you walk through."
Activity 22-8 original ladder-and-tire course adapted to flat rings

Floor-Ladder & Ring Hop Course

Step through floor-ladder spaces, then make controlled jumps or steps into flat rings before following the return path.

Teacher Notes: Setup, Safety & Variations
Equipment: Flat agility ladder or tape grid · 4–6 flat agility rings or hula hoops · Cones
Setup: Place the ladder and rings on a clean, non-slip surface with a clear stopping area after the final ring.
Safety: Flat rings are the preferred classroom adaptation. If play tires are used, they must rest completely flat, be free of exposed wire or damage, and be permitted by program policy.
Make It Easier: Walk one foot into each ladder space and step through the rings.
Make It Harder: Use two controlled steps in selected ladder spaces, then make two-foot jumps into widely spaced rings.
Teacher Cue: "Step through the ladder, then jump or step into each ring with control."
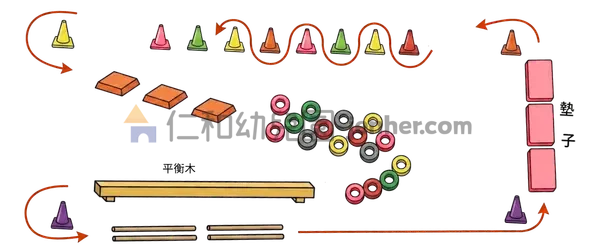
Activity 22-9: Mat Roll, Floor Rings & Low Beam Course

Mat Roll, Floor Rings & Low Beam Course

Complete a sideways log roll, travel through flat floor rings, walk across a low balance beam or floor line, and follow the cone route back.

Teacher Notes: Setup, Safety & Variations
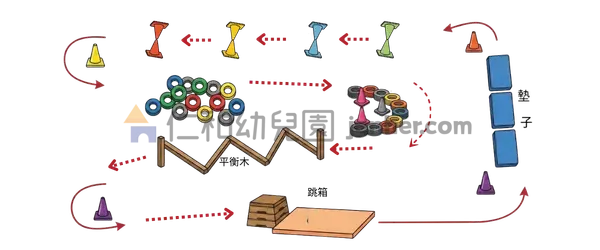
Equipment: Tumbling mat · Flat agility rings or hula hoops · Low balance beam or floor tape line · Cones
Setup: Separate stations so a child leaving the mat does not enter the beam or ring landing space of another child.
Safety: Follow the beam manufacturer's age and spotting guidance and use a floor line instead of an elevated beam when trained support is not available.
Make It Easier: Use a sideways log roll and a taped balance line on the floor.
Make It Harder: Pause for one count on a marked spot along the low beam or line, then continue walking with control.
Teacher Cue: "Roll, find your feet, step through the rings, and walk the balance path slowly."
Activity 22-10 original vault-and-beam circuit adapted to a low step platform

Mat, Beam & Low-Step Course

Move through a mat station, floor rings, a low balance path, and a stable low step, choosing a step-down rather than a jump when needed.

Teacher Notes: Setup, Safety & Variations
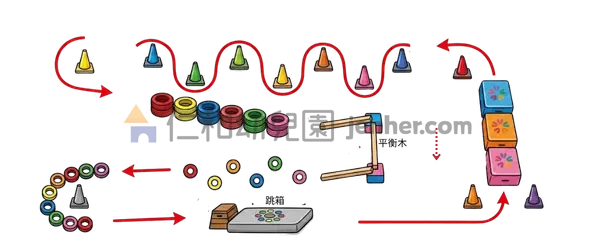
Equipment: Tumbling mat · Flat rings · Low balance beam or floor line · Manufacturer-rated low step platform · Landing mat if required
Setup: Keep the step and landing zone separate from the next station and follow all equipment spacing requirements.
Safety: Use only stable equipment intended for children's climbing or stepping and provide trained adult support when required by the equipment or program.
Make It Easier: Step up and step down while holding an adult's hand when appropriate.
Make It Harder: Step down independently to a clearly marked two-foot landing spot without adding height.
Teacher Cue: "Step up, look at your landing spot, step down, and find your balance."
Activity 22-11: Changing-Height Balance Course

Changing-Height Balance Course

Travel across a sequence of low, stable balance and stepping surfaces, slowing down whenever the height or surface changes.

Teacher Notes: Setup, Safety & Variations
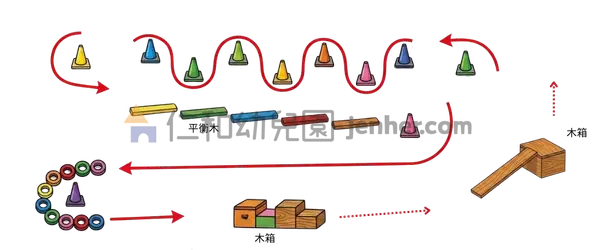
Equipment: Low balance equipment and step platforms rated for the age group · Safety mats as required by manufacturers
Setup: Arrange only as many elevated stations as adults can actively supervise and keep all landing and dismount areas clear.
Safety: Do not use a fixed height progression for every child. Follow manufacturer limits and replace an elevated section with a floor path whenever control or supervision is insufficient.
Make It Easier: Use floor lines and low stepping spots with adult hand support as needed.
Make It Harder: Add a wider direction change on the same low equipment rather than increasing height.
Teacher Cue: "Slow down when the level changes and choose the next safe step."
Activity 22-12: Five-Station Gross Motor Circuit

Five-Station Gross Motor Circuit

Combine five simple stations such as floor rings, a balance path, a low step, a stable balance surface, and a crawl tunnel, reducing the number of stations when supervision or space is limited.

Teacher Notes: Setup, Safety & Variations
Equipment: Flat rings · Low balance path · Stable low step · Age-appropriate balance surface · Crawl tunnel · Cones or floor markers
Setup: Create a one-way route with clear waiting spots and enough separation that children are not entering the next child's landing or balance space.
Safety: Staffing needs depend on the equipment, room, and program rules. Remove or simplify any station that cannot be actively supervised or used according to its instructions.
Make It Easier: Use three floor-level stations before adding low balance or step equipment.
Make It Harder: Add a stop-and-go music cue while keeping the same equipment height and traffic spacing.
Teacher Cue: "One station at a time—wait for a clear space, then follow the path."
Frequently Asked Questions

Preschool Obstacle Course & Continuous Flow FAQ

Practical guidance on small-space adaptation, traffic flow, budget setup, and supervision.

How do I adapt these obstacle courses for small classroom spaces?
For compact classrooms, use perimeter layouts with low-profile props such as painter’s tape balance lines, flat floor markers, and foldable mats. Keep the course to 3–4 simple elements with a one-way route, and use walking, crawling, or short turns rather than running when the available clearance is limited.
How can a continuous-flow circuit reduce waiting time in preschool movement lessons?
Long waits can make it harder for young children to stay engaged. In a continuous-flow circuit, several simple stations operate at the same time and children enter only when the next station is clear. This can reduce line-waiting and give more children opportunities to stay actively involved.
Which developmental domains do these courses address (Head Start ELOF)?
These layouts can provide practice related to the Perceptual, Motor, and Physical Development domain of the Head Start Early Learning Outcomes Framework, especially P-PMP 1 — control, strength, and coordination of large muscles and P-PMP 2 — using perceptual information to guide movement and interactions with objects and other people.
What basic equipment do I need to start on a limited budget?
Many layouts can be simplified with common preschool materials such as plastic cones, flat floor markers, foam tumbling mats, painter’s tape, soft beanbags, and open containers for targets. Choose equipment that is stable, age-appropriate, and intended for the way you plan to use it.
How should educators supervise multi-station obstacle circuits?
Place adults where children need the most support, especially at any elevated, balancing, tumbling, or landing station. Follow your program’s required supervision ratios, staff-training requirements, and equipment instructions. Reduce or remove a station if adequate supervision cannot be maintained.
ADVERTISEMENT

Try Next