
ECE Movement Curriculum · Chapters 9 & 10 Guide

38 Balance Beam Activities for Preschoolers: Short & Long Beam Play

Engage your preschool class with 38 illustrated balance beam activities adapted from decades of early childhood gross motor practice at Jenher. Features modular short beam hurdle and slalom paths alongside continuous long beam walks, crawls, and cooperative partner games.

ADVERTISEMENT
ECE Equipment Showcase

Our Short & Long Balance Beam Equipment

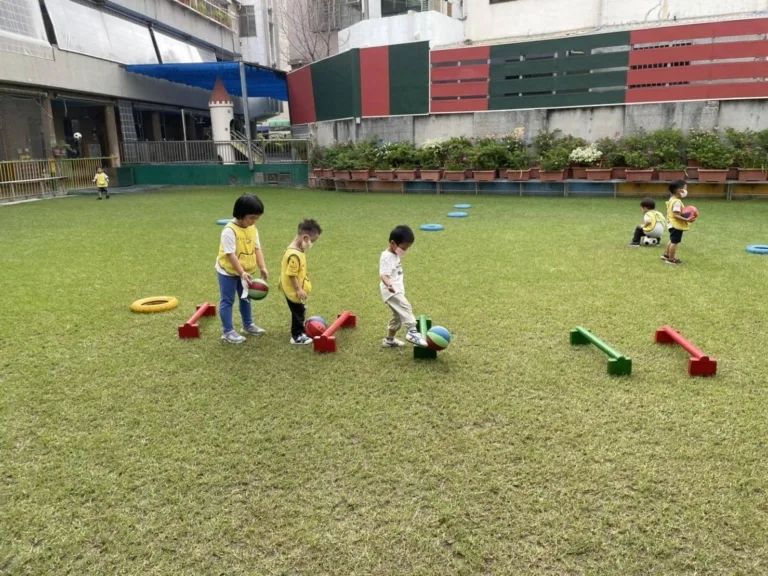
Structural diagrams and live classroom practice photos illustrating the modular short balance beams and continuous long balance beams used at Jenher Preschool.

Quick Teacher Guide: Short & Long Balance Beams

Educator-Controlled Setup

Educators arrange low modular beams in manufacturer-intended floor-level layouts; children may help move lightweight equipment only under direct supervision and without stacking or constructing elevated structures.

Low Hurdle & Stepping Agility

Use purpose-built, manufacturer-approved low hurdle equipment or soft collapsible obstacles for graduated stepping and jumping (Activities 9-5 & 9-24). Prohibit stacking loose wooden beams.

Short vs. Long Beam Roles

Part 1 Short Beams (23 activities) emphasize jumping, hopping rhythms, and agility; Part 2 Long Beams (15 activities) focus on linear gait and partner balance.

Archival Count Integrity

Provides 38 verified activities across Chapters 9 & 10 (23 short beam + 15 long beam), faithfully documenting the archive without inventing unverified activity 9-22.

Part 1 · Modular Short Balance Beam (Chapter 9)

23 Short Balance Beam Activities

Explore modular short beam activities: low hurdle step-overs, slalom weaving, tunnel crawls, rhythmic jumps, and cooperative bridge challenges designed for versatile indoor and outdoor station play.

Activity 9-1: Controlled Hurdle Step

Controlled Hurdle Step

Step forward with controlled balance and step cleanly over a low short balance beam with a soft single-foot step and balanced landing.

Teacher Notes: Setup, Safety & Variations
Equipment: 1–2 low short balance beams (approx. 6 in / 15 cm high) · Safety landing mat
Setup: Set up an open straight runway with ample clear deceleration space beyond the beam.
Safety: Ensure beam is securely placed on non-slip flooring. Guide children to step over with controlled, soft knee flexion.
Make It Easier: Walk up to the beam and step over with one foot leading while holding a teacher's hand.
Make It Harder: Set 2–3 beams in a continuous straight line spaced generously for rhythmic consecutive stepping.
Teacher Cue: "Eyes looking forward, lift your knees high, and step softly on quiet feet!"
Activity 9-2: S-Curve Weave & RPS Showdown

S-Curve Weave & RPS Showdown

Weave smoothly in an S-curve around upright short beams, then pause upon meeting a classmate to play a fun rock-paper-scissors game.

Teacher Notes: Setup, Safety & Variations
Equipment: 4–6 short balance beams placed vertically or spaced horizontally as slalom markers
Setup: Create a wide slalom lane with at least 4 ft between obstacles so children can navigate safely.
Safety: Remind children to keep their heads up while weaving to prevent accidental collisions.
Make It Easier: Weave around the beams at a steady walking pace without the rock-paper-scissors stop.
Make It Harder: Walk through the slalom path and pause in a balanced flamingo stance while playing rock-paper-scissors.
Teacher Cue: "Curve gently like a snake, stop when you meet a friend, and show your hand!"
Activity 9-3: Low Foam Tunnel Crawl

Low Foam Tunnel Crawl

Crawl through a low purpose-built crawl tunnel or soft foam arch over padded gym mats, practicing spatial estimation and prone crawling control.

Teacher Notes: Setup, Safety & Variations
Equipment: Purpose-built preschool foam crawl arch / tunnel · Thick safety mat underneath
Setup: Place safety mats under and around the tunnel structure on a stable, non-slip floor.
Safety: Modern safety adaptation: Use purpose-built preschool foam crawl arches or certified crawl tunnels placed over padded mats. Never improvise tunnels by leaning heavy loose beams against each other, as sandbags and pads do not make improvised elevated structures equivalent to certified apparatus.
Make It Easier: Crawl under a wider and taller foam arch on hands and knees.
Make It Harder: Low-crawl (belly crawl) through the foam tunnel without touching the padded sides.
Teacher Cue: "Stay low like a turtle and glide through the soft cave!"
Activity 9-4: Crawl Tunnel & Low Step-Over Combo

Crawl Tunnel & Low Step-Over Combo

Crawl through the low foam tunnel, rise smoothly into a standing position, and step over a low crosswise hurdle bar on padded mats.

Teacher Notes: Setup, Safety & Variations
Equipment: 1 foam crawl tunnel + 1 low foam hurdle bar · Padded safety matting
Setup: Arrange the tunnel followed by a hurdle bar placed 4–5 ft ahead in a clear straight path.
Safety: Ensure children regain full upright balance on the mat before attempting the step-over obstacle.
Make It Easier: Pause in a stable standing balance before stepping over the hurdle.
Make It Harder: Flow smoothly from the crawl into a continuous forward step-over at a steady walking pace.
Teacher Cue: "Crawl low like a fox, stand up tall, and step high over the obstacle!"
Activity 9-5: Low Collapsible Hurdle Step-Over

Low Collapsible Hurdle Step-Over

Step or hop across low, collapsible foam hurdle obstacles set at safe graduated heights to build obstacle clearance and stepping skills.

Teacher Notes: Setup, Safety & Variations
Equipment: 2–4 low collapsible foam hurdle bars / soft agility obstacles · Landing mats
Setup: Set multiple lanes with low and medium hurdle heights to match varying readiness.
Safety: Modern safety adaptation: Use purpose-built, manufacturer-approved low hurdles or soft collapsible foam obstacles. Prohibit stacking loose or unanchored wooden beams.
Make It Easier: Practice stepping over a single low foam hurdle with adult hand support.
Make It Harder: Perform a continuous single-foot step-over across 2–3 low collapsible hurdles in rhythm.
Teacher Cue: "Lift your knees high, step over the soft bar, and land softly with quiet feet!"
Activity 9-6: Low-Profile Stilt Walking

Low-Profile Stilt Walking

Stand balanced on wide-base preschool bucket stilts while grasping safety cords, taking deliberate coordinated steps across a flat padded floor.

Teacher Notes: Setup, Safety & Variations
Equipment: 1 pair of wide-base preschool balance bucket stilts with child-safe pull cords
Setup: Flat, non-slip gymnastics mats or smooth indoor floor free of trip hazards.
Safety: Modern safety adaptation: Use low-profile wide-base preschool stilts on flat padded floors with non-slip bases. Ensure pull cords are short, untangled, and never looped around wrists or neck. Provide continuous 1-on-1 adult supervision.
Make It Easier: Practice shifting weight side-to-side while standing on stilts in a stationary position.
Make It Harder: Walk forward along a straight tape line on the floor while pulling gently upward on cords with each step.
Teacher Cue: "Pull up with your hands, step up with your feet, and walk tall like a robot!"
Activity 9-7: Straddle Beam Rocking Horse

Straddle Beam Rocking Horse

Straddle a low, securely cushioned beam and gently shift body weight forward using arm support and hip slides along the wood.

Teacher Notes: Setup, Safety & Variations
Equipment: 1 smooth, rounded low short balance beam (height < 6 in) · Padded floor mat
Setup: Place beam firmly on a padded surface with adult spotting nearby.
Safety: Modern safety adaptation: Keep beam extremely low to the ground and ensure surfaces are smooth and splinter-free. Children must keep feet close to the floor for instant stability.
Make It Easier: Keep feet touching the floor on both sides while gently rocking back and forth.
Make It Harder: Use arm support on the beam to shift the hips forward 2–3 inches without feet touching the ground.
Teacher Cue: "Hold on with strong hands, scoot your hips forward, and ride like a steady pony!"
Activity 9-8: Beam Straddle Pendulum Jumps

Beam Straddle Pendulum Jumps

Place two hands firmly on the low beam center and hop both feet together from side to side in a controlled pendulum motion on padded mats.

Teacher Notes: Setup, Safety & Variations
Equipment: 1 low short balance beam (< 6 in high) · Thick safety mat on both sides
Setup: Station area with clear padded room on left and right sides.
Safety: Maintain a secure two-hand grip in the middle of the low beam. Keep hops small and controlled.
Make It Easier: Step one foot at a time from side to side while supporting weight on the beam.
Make It Harder: Perform 3–4 continuous pendulum hops from side to side with quiet, cushioned landings.
Teacher Cue: "Hands press down strong, feet swing left and right like a grandfather clock!"
Activity 9-9: Diagonal Beam Zigzag Hops

Diagonal Beam Zigzag Hops

Step or hop along a zigzag pathway of diagonally placed low short beams, changing lateral direction with each balanced landing.

Teacher Notes: Setup, Safety & Variations
Equipment: 3–5 low short balance beams arranged in a diagonal zigzag pattern · Non-slip gym mats
Setup: Lay out beams at 45-degree angles with 2–3 ft gaps between landing zones.
Safety: Ensure floor mats prevent any beam movement upon landing. Cue children to spot their next landing zone before moving.
Make It Easier: Step across the zigzag pattern with a single-leg weight shift at a steady walking pace.
Make It Harder: Hop with both feet together across each diagonal segment with a momentary balance freeze.
Teacher Cue: "Step right, step left, freeze like a statue, and step again!"
Activity 9-10: Two-Foot Parallel Beam Step-Overs

Two-Foot Parallel Beam Step-Overs

Step or hop consecutively over multiple parallel low short beams placed across the runway with two-foot controlled landings.

Teacher Notes: Setup, Safety & Variations
Equipment: 3–5 low short balance beams placed parallel like ladder rungs · Safety floor matting
Setup: Set beams 2.5–3 ft apart on a long cushioned runway.
Safety: Enforce soft landings on balls of feet with bent knees to protect developing joints. Maintain ample spacing between children.
Make It Easier: Step over each parallel beam one foot at a time at a steady walking pace.
Make It Harder: Hop over 3 low beams with a brief pause between each jump to stabilize balance.
Teacher Cue: "Feet glued together like bunny ears, spring up, and land soft on whisper feet!"
Activity 9-11: Single-Leg Flamingo Hops

Single-Leg Flamingo Hops

Balance on one leg and take controlled single-foot hops across low foam lines to build unilateral leg strength and stability.

Teacher Notes: Setup, Safety & Variations
Equipment: 2–3 low foam bars or floor tape lines · Cushioned mat
Setup: Single-lane practice zone with open space on both sides.
Safety: Allow children to switch legs whenever fatigued. If balance is lost, encourage putting the free foot down immediately.
Make It Easier: Hop on one foot across flat floor lines before attempting raised obstacles.
Make It Harder: Hop over 2 floor bars on the right foot, pause for 2 seconds, then switch to the left foot.
Teacher Cue: "Stand tall like a flamingo, lift one knee, and take little controlled hops!"
Activity 9-12: Alternating Single-to-Double Rhythm Jumps

Alternating Single-to-Double Rhythm Jumps

Alternate between single-leg steps in beam intervals and two-foot straddle landings around the low beams in a hopscotch rhythm.

Teacher Notes: Setup, Safety & Variations
Equipment: 4–6 low short balance beams laid out in a rhythmic hopscotch grid · Floor mats
Setup: Straight course with clear spacing between single-foot spots and double-foot straddles.
Safety: Ensure children understand the rhythm pattern before increasing pace. Keep hurdle heights minimal.
Make It Easier: Walk the rhythm pattern: step one foot, then step two feet wide.
Make It Harder: Perform the entire hopscotch pattern at a steady, controlled tempo without rushing.
Teacher Cue: "One foot in the middle, two feet out wide—hop, step, hop, step!"
Activity 9-13: Straddle-In Straddle-Out Jumping Jacks

Straddle-In Straddle-Out Jumping Jacks

Jump both feet wide to straddle the short balance beam on the floor, then jump both feet together into the gap between beams.

Teacher Notes: Setup, Safety & Variations
Equipment: 3–4 short balance beams placed on the floor · Foam gym mats
Setup: Straight lane with ample space on both sides of the beams for feet to land safely.
Safety: Remind children not to land on the wooden edges of the beam; feet land flat on the mat on either side.
Make It Easier: Step wide, step together at a walking pace.
Make It Harder: Complete 3–4 consecutive in-and-out hops with controlled rhythm.
Teacher Cue: "Open feet wide like a star, close feet tight like a pencil!"
Activity 9-14: Connected Straight Beam Bridge Walk

Connected Straight Beam Bridge Walk

Walk heel-to-toe along several short balance beams connected end-to-end into a continuous narrow bridge with arms out for balance.

Teacher Notes: Setup, Safety & Variations
Equipment: 4–6 short balance beams aligned tightly end-to-end · Padded safety mats on both sides
Setup: Long straight pathway with facility-appropriate landing mat coverage along both sides.
Safety: Check that beam joints are tightly abutted with zero gap where small feet could get caught. Adult spots alongside.
Make It Easier: Walk along a 2-inch wide floor tape line before moving onto the raised wooden beam.
Make It Harder: Walk the bridge while holding a lightweight beanbag on the head without letting it drop.
Teacher Cue: "Airplane wings out wide, eyes looking ahead, heel connects to toe!"
Activity 9-15: Straddle-Leg Floor Walk

Straddle-Leg Floor Walk

Straddle the short balance beam with feet placed flat on the floor on either side, walking forward at a steady controlled pace without touching the wood.

Teacher Notes: Setup, Safety & Variations
Equipment: 2–3 short balance beams connected end-to-end on floor · Padded mat
Setup: Open mat area suitable for toddlers and beginner preschoolers.
Safety: Low-risk beginner activity. Maintain a controlled walking pace; avoid fast shuffling or running.
Make It Easier: Walk slowly with a wide stance over floor tape lines.
Make It Harder: Walk forward with high knee lifts on each side while keeping the beam centered between feet.
Teacher Cue: "Feet wide like a giant, walk steady over the bridge without touching the wood!"
Activity 9-16: Hands-and-Knees Beam Bridge Crawl

Hands-and-Knees Beam Bridge Crawl

Crawl forward on hands and knees along the low surface of connected short balance beams to develop bilateral coordination and core stability.

Teacher Notes: Setup, Safety & Variations
Equipment: 3–4 short balance beams connected end-to-end (< 6 in high) · Thick safety matting
Setup: Low-height bridge setup with close teacher proximity.
Safety: Ensure beam surface is smooth and low. If a child feels unsteady, have them lower their hips or step down immediately. Do not perform elevated narrow bear crawls.
Make It Easier: Crawl on a wide floor line with hands and knees.
Make It Harder: Crawl along a wide low foam beam with hands and knees, maintaining steady rhythmic pacing.
Teacher Cue: "Grip with steady hands, crawl forward like a friendly bear, one step at a time!"
Activity 9-17: Beam Walk, Step-Down & Floor Pivot

Beam Walk, Step-Down & Floor Pivot

Walk along the low balance beam to the marked end, step down onto the padded floor, turn around with controlled balance, and return.

Teacher Notes: Setup, Safety & Variations
Equipment: Standalone low short balance beams (approx. 24 in / 60 cm long) · Foam mats
Setup: Distribute individual beams across the room so children can practice with adequate spacing.
Safety: Modern safety adaptation: General classroom version keeps directional turns on the floor. Do not teach unsupported pivot turns on narrow raised beams. Adult spots children during step-down transitions.
Make It Easier: Walk to the end of the beam and step down onto the floor with teacher holding one hand.
Make It Harder: Walk forward heel-to-toe along the beam, step down onto a marked floor spot, pause on one foot for 2 seconds, and return.
Teacher Cue: "Walk to the end, step down soft like a feather, turn on the floor, and walk back!"
Activity 9-18: Parallel Lane Partner Bridge Walk

Parallel Lane Partner Bridge Walk

Two children walk along separate parallel beam tracks or with one child on the floor, matching walking tempo through visual cues without pulling hands.

Teacher Notes: Setup, Safety & Variations
Equipment: 2 parallel lines of short balance beams · Surrounding floor mats
Setup: Open lane allowing both partners comfortable walking room in separate tracks.
Safety: Modern safety adaptation: Default to separate parallel lanes or floor-level partner walking with independent balance. Partners must never pull, jerk, or lean on each other while on elevated beams.
Make It Easier: A teacher walks alongside holding the child's hand for balance.
Make It Harder: Both partners walk in parallel lanes spaced 2 ft apart, stopping and starting on shared counting cues.
Teacher Cue: "Match your partner's footsteps with your eyes, walking steady across your own bridge!"
Activity 9-19: Side-by-Side Dual Beam Track Walk

Side-by-Side Dual Beam Track Walk

Two children walk side-by-side on parallel beam tracks in independent lanes, coordinating balance and walking rhythm through shared counting.

Teacher Notes: Setup, Safety & Variations
Equipment: 2 parallel lines of short balance beams spaced 18–24 in apart · Gym mats
Setup: Dual track runway with safety mats underneath and alongside both beams.
Safety: Modern safety adaptation: Maintain separate parallel beam lanes without linking arms or touching shoulders while elevated. Coordinate pacing through visual matching and verbal counting.
Make It Easier: Walk on parallel tape lines on the floor before moving to raised beams.
Make It Harder: Walk in parallel lanes while matching footsteps to a steady slow drumbeat.
Teacher Cue: "Step together, left, right, left, right, like friendly marching partners!"
Activity 9-20: Partner Wheelbarrow Beam Step-Over

Partner Wheelbarrow Beam Step-Over

One child supports weight on hands while a partner gently holds their legs, cooperating to guide hands and body over a flat floor obstacle.

Teacher Notes: Setup, Safety & Variations
Equipment: 1 very low flat foam beam or soft floor bar · Thick cushioned safety mats
Setup: Dedicated soft-matted zone with 1-on-1 teacher supervision.
Safety: Modern safety adaptation: Conduct strictly on padded floor mats over flat foam bars only, NEVER on elevated or narrow beams. The standing partner holds at the thighs or knees (not ankles) and walks slowly. Stop immediately if the crawler's arms tire.
Make It Easier: Practice static plank holds or bear crawls across the flat floor without a partner lifting legs.
Make It Harder: Move forward 6 feet on the mat and step hands cleanly over a flat foam strip with adult spotting.
Teacher Cue: "Strong straight arms like pillars, look at your hands, and take slow gentle steps!"
Activity 9-21: Narrow Bridge Face-Off & RPS

Narrow Bridge Face-Off & RPS

Two children start from opposite ends of a low beam bridge, stop at least 2 feet apart before the center, and play rock-paper-scissors in a balanced stance.

Teacher Notes: Setup, Safety & Variations
Equipment: 4–6 connected low short balance beams · Safety mats on all sides
Setup: Center area of the bridge clearly marked with visual stop lines 2 ft apart.
Safety: Modern safety adaptation: Children must come to a complete stop at marked stop lines at least 2 feet apart before playing rock-paper-scissors; strictly prohibit pushing or physical contact on elevated beams.
Make It Easier: Stop and play rock-paper-scissors with both feet firmly planted in a wide stance.
Make It Harder: Hold a one-leg flamingo pose for the duration of the rock-paper-scissors countdown.
Teacher Cue: "Walk to your stop line, freeze on one foot, 1-2-3 show your hand, and celebrate together!"
Activity 9-23: Controlled Hurdle Step Course

Controlled Hurdle Step Course

Step smoothly through a series of low collapsible foam hurdles on gym mats, lifting knees cleanly over each obstacle at a steady walking pace.

Teacher Notes: Setup, Safety & Variations
Equipment: 3–4 low collapsible foam hurdles (approx. 4–6 in high) · Landing mats
Setup: Straight runway with obstacles spaced generously to allow 2–3 walking steps between.
Safety: Use lightweight collapsible foam hurdles. Maintain a controlled walking pace rather than running or sprinting over obstacles.
Make It Easier: Step over single low foam bars at an easy walking pace.
Make It Harder: Maintain a continuous stepping rhythm over 3 obstacles without pausing.
Teacher Cue: "High knees up, step over the hurdle, and walk smooth and steady!"
Activity 9-24: Low Collapsible Obstacle Step-Jump

Low Collapsible Obstacle Step-Jump

Approach low collapsible foam hurdles at a controlled pace and execute a gentle two-foot or single-foot step-over with a soft, cushioned landing.

Teacher Notes: Setup, Safety & Variations
Equipment: Low collapsible foam hurdles · Thick 2-inch gymnastics landing mats
Setup: Spacious runway with generous deceleration zone beyond the final obstacle.
Safety: Modern safety adaptation: Ensure hurdles are low, lightweight, and easily collapsible on contact. Never use rigid high obstacles or sprint takeoffs. Mandate soft two-foot landings with deep knee absorption.
Make It Easier: Lower hurdle height to the lowest setting and practice one obstacle at a time.
Make It Harder: Clear 2 low collapsible hurdles in rhythm with a brief stabilizing pause between jumps.
Teacher Cue: "Step up, spring softly, and land like a quiet ninja with bendy knees!"
Part 2 · Extended Long Balance Beam (Chapter 10)

15 Long Balance Beam Activities

Explore continuous long beam activities: upright linear walks, sideways crab steps, bear and kneeling crawls, seated core balance holds, and cooperative separate-lane partner balance on extended low-profile beams.

Activity 10-1: Straight Long Beam Walk

Straight Long Beam Walk

Walk the full length of an extended 8–10 foot long balance beam with arms outstretched like airplane wings, maintaining upright posture and steady pace.

Teacher Notes: Setup, Safety & Variations
Equipment: 1 standard long balance beam (8–10 ft / 2.5–3 m long, low height 2–4 in off floor) · Safety mats
Setup: Set up beam on flat flooring with equipment- and facility-appropriate safety mats along both sides and ends.
Safety: Check that supporting base brackets are fully tightened and non-slip pads are in place. Adult spots alongside beginner walkers.
Make It Easier: Walk along a 4-inch wide line taped on the gym floor or carpet.
Make It Harder: Walk forward heel-to-toe while holding a beanbag or ring balanced on the head.
Teacher Cue: "Airplane wings wide, look at the end of the bridge, and step forward smoothly!"
Activity 10-2: Controlled Pace Beam Walk

Controlled Pace Beam Walk

Practice changing walking tempo from slow to moderate paced steps across the low long beam while keeping trunk upright and centered.

Teacher Notes: Setup, Safety & Variations
Equipment: 1 low long balance beam (< 3 in off ground) · Surrounding safety matting
Setup: Clear, unobstructed area with generous run-off space at the exit end.
Safety: Modern safety adaptation: Replace fast running on elevated beams with controlled, brisk walking steps on low-to-the-ground equipment. Fast sprints on narrow elevated beams are hazardous for early childhood.
Make It Easier: Take slow, deliberate baby steps across the beam.
Make It Harder: Walk with steady brisk steps to the halfway mark, pause for 2 seconds in a tall balance pose, and walk to the finish.
Teacher Cue: "Quick little steps, stay centered over the beam, and stop on command like a statue!"
Activity 10-3: Sideways Crab Walk

Sideways Crab Walk

Turn sideways on the beam and step laterally in a crab-walking pattern, bringing feet together and apart to strengthen hip abductors.

Teacher Notes: Setup, Safety & Variations
Equipment: 1 standard low long balance beam · Padded floor mats
Setup: Long beam station with side mats covering the full length.
Safety: Keep knees slightly soft and toes pointing straight across the beam. Never cross feet over each other during side-stepping.
Make It Easier: Side-step along a straight line on the floor while holding teacher's hands.
Make It Harder: Side-step to the right across the full beam, then side-step back to the left without turning around.
Teacher Cue: "Turn sideways like a friendly crab: step, slide, step, slide all the way across!"
Activity 10-4: Wide Straddle Walk

Wide Straddle Walk

Walk forward with one foot on the beam and one foot on the mat (or feet straddling the beam sides) to build baseline confidence for beginners.

Teacher Notes: Setup, Safety & Variations
Equipment: 1 low long balance beam · Floor mats
Setup: Ideal for 2–3 year olds and children hesitant to walk fully on top of the beam.
Safety: Low hazard activity. Ensure floor mat level is even with or slightly below the beam base.
Make It Easier: Walk with both feet on the floor, keeping the beam between the legs.
Make It Harder: Take 3 straddle steps, then step both feet onto the top of the beam for 3 balance steps.
Teacher Cue: "One foot on the bridge, one foot on the shore—walk forward steady and strong!"
Activity 10-5: Hands-and-Knees Long Beam Crawl

Hands-and-Knees Long Beam Crawl

Crawl on hands and knees along the low surface of the long balance beam to develop reciprocal quadrupedal coordination and core stability.

Teacher Notes: Setup, Safety & Variations
Equipment: 1 low long balance beam (< 3 in high) or wide foam balance track · Side cushioning mats
Setup: Flat indoor space with full mat protection on either side.
Safety: Modern safety adaptation: Keep center of mass low on wide, low-profile beams (< 3 in off ground). Avoid elevated narrow bear crawls; children should crawl on hands and knees with adult spotting.
Make It Easier: Crawl on hands and knees on a wide floor line.
Make It Harder: Crawl along an extra-wide low foam beam while maintaining steady pacing.
Teacher Cue: "Strong bear paws on the log, crawl forward slow and steady to the other side!"
Activity 10-6: Kneeling Beam Crawl

Kneeling Beam Crawl

Rest knees on the long beam and crawl forward with hands gently guiding along the sides, testing deep core stability and hip balance.

Teacher Notes: Setup, Safety & Variations
Equipment: 1 padded low long balance beam · Soft gym mats
Setup: Place a cushioned beam cover or soft foam mat over the beam to protect tender preschool knees.
Safety: Teacher spots closely. Children should wear long pants or knee-padded clothing for comfort.
Make It Easier: Kneel and crawl across a line of floor mats before trying the beam.
Make It Harder: Crawl forward on knees with hands resting lightly on hips with adult spotting.
Teacher Cue: "Knees on the soft track, belly strong like a superhero, and glide forward!"
Activity 10-7: Seated Beam Slide & Push

Seated Beam Slide & Push

Sit straddled on the low beam and push forward using arms and legs in a synchronized sliding movement along the smooth surface.

Teacher Notes: Setup, Safety & Variations
Equipment: 1 smooth, rounded low long balance beam · Safety matting
Setup: Beam placed close to floor level (< 4 in) with soft landing mats surrounding.
Safety: Check that beam surface is smooth, sanded, and splinter-free. Keep sliding speed controlled with adult spotting.
Make It Easier: Sit on the beam and practice rocking gently without moving forward.
Make It Harder: Slide forward along the low beam using gentle arm presses with feet close to the floor for balance.
Teacher Cue: "Hands press down behind you, push your body forward, and scoot like a little boat!"
Activity 10-8: Seated Side Balance Hold

Seated Side Balance Hold

Sit sideways on the low beam with legs dangling near the mat, lifting both hands off the wood to hold a stable upright core balance.

Teacher Notes: Setup, Safety & Variations
Equipment: 1 low long balance beam · Thick safety mat
Setup: Group multiple children seated along the length of the beam with generous spacing.
Safety: Ensure beam height is low enough (< 4 in) that feet are within inches of the mat.
Make It Easier: Hold the edge of the beam with one hand while balancing.
Make It Harder: Extend both arms straight out to the sides and hold the balance for a count of 5 seconds.
Teacher Cue: "Sit tall like a royal king or queen, hands out wide, and hold steady!"
Activity 10-9: Prone Airplane Balance Hold

Prone Airplane Balance Hold

Lie prone (belly-down) along the top of the padded low beam, extending arms out to the sides and legs back to perform an airplane flight pose.

Teacher Notes: Setup, Safety & Variations
Equipment: 1 padded low long balance beam · Padded floor mats
Setup: Station area with teacher standing directly beside the child to assist positioning.
Safety: Ensure the beam has a soft vinyl or foam pad so the belly and ribs rest comfortably. Spot hips and shoulders.
Make It Easier: Lie prone with hands resting on the floor for support, lifting only the head and chest.
Make It Harder: Lift arms, chest, and toes simultaneously and hold the airplane pose for 3–5 seconds under teacher spotting.
Teacher Cue: "Belly on the soft cloud, wings spread wide, and fly like a soaring airplane!"
Activity 10-10: Straddle Seated Balance Hold

Straddle Seated Balance Hold

Sit straddled facing the end of the low beam with legs on either side, raising both arms high or wide to practice vertical spine alignment.

Teacher Notes: Setup, Safety & Variations
Equipment: 1 low long balance beam · Safety gym mats
Setup: Children sit along the beam with generous spacing.
Safety: Keep beam close to the floor (< 4 in) so feet easily contact the mat if balance wavers.
Make It Easier: Keep one hand resting on the beam in front of the body.
Make It Harder: Raise both arms straight overhead and gently turn the head left and right without wobbling.
Teacher Cue: "Sit tall with a long spine, reach your hands to the sky, and freeze like a statue!"
Activity 10-11: Stepping Over Mid-Beam Obstacle

Stepping Over Mid-Beam Obstacle

Walk along the long balance beam, pause before a small soft cone or foam block placed at the midpoint, and step cleanly over it.

Teacher Notes: Setup, Safety & Variations
Equipment: 1 low long balance beam · 1–2 soft mini foam blocks or beanbags · Safety mats
Setup: Straight walking lane with obstacle placed midway along the beam.
Safety: Use lightweight soft obstacles (foam beanbags or mini collapsible cones) that squash flat if stepped on.
Make It Easier: Step over a piece of colored tape stuck flat across the beam top.
Make It Harder: Step over 2 soft obstacles placed along the beam length with adult spotting.
Teacher Cue: "Walk steady, lift your front knee high over the soft block, and keep walking smoothly!"
Activity 10-12: Parallel Partner Passing Walk

Parallel Partner Passing Walk

Two children walk in separate parallel lanes (on low wide beams or floor tape lines) and coordinate their passing movement using visual rhythm and verbal cues without physical contact.

Teacher Notes: Setup, Safety & Variations
Equipment: 2 parallel low-profile balance tracks (height < 3 in) or wide floor tape lines · Side mats
Setup: Dedicated dual-lane station with generous clearance between parallel tracks.
Safety: Modern safety adaptation: Conduct on separate parallel tracks or wide floor-level pathways. Do not have two children meet, hold hands, squeeze past, or pass each other on a raised beam. Adult supervision guides calm pacing.
Make It Easier: Walk in separate parallel floor tape lanes matching footsteps at a slow walking tempo.
Make It Harder: Walk in parallel low beam lanes spaced 2 feet apart, matching speed to teacher counting cues.
Teacher Cue: "Watch your partner with your eyes, walk in your own lane, and wave as you pass by!"
Activity 10-13: Partner Supported Wheelbarrow on Floor/Low Beam

Partner Supported Wheelbarrow on Floor/Low Beam

One child places hands on a low padded beam while a partner supports their legs from the floor, walking forward 3–4 steps with teacher spotting.

Teacher Notes: Setup, Safety & Variations
Equipment: 1 extra-low padded beam (< 3 in off floor) or floor mat · Safety cushioning
Setup: Soft-matted zone with 1-on-1 adult supervision per pair.
Safety: Modern safety adaptation: Conduct on floor-level padded surfaces only, never on narrow or elevated bars. The standing partner holds thighs (not ankles) and moves at the crawler's pace. Stop immediately upon fatigue.
Make It Easier: Static high-plank hold with hands on the low beam and feet on the floor.
Make It Harder: Take 3–4 slow forward hand-steps along the padded beam with teacher supporting the legs.
Teacher Cue: "Strong arms, walk your hands like little bulldozer tracks, slow and steady!"
Activity 10-14: Obstacle Pathway Follow-the-Leader

Obstacle Pathway Follow-the-Leader

Follow a pathway along the low beam around visual markers, practicing spatial tracking and active listening at a steady walking pace.

Teacher Notes: Setup, Safety & Variations
Equipment: Long balance beam with soft foam markers · Surrounding mats
Setup: Open circuit setup where children navigate along the beam following a designated leader or path.
Safety: Maintain generous buffer space between children to prevent bumping from behind. Use walking-only cues; avoid fast running games on beams.
Make It Easier: Walk the pathway at an unhurried pace following a teacher leader.
Make It Harder: Incorporate listening signals (green cue = walk, red cue = freeze on beam in a balanced stance).
Teacher Cue: "Keep a safe distance from your friend, watch the path markers, and follow the train!"
Activity 10-15: Partner Beanbag Exchange on Low Beam

Partner Beanbag Exchange on Low Beam

Two children walk toward each other from opposite ends of a low beam to marked stop lines spaced 2 feet apart, exchange beanbags hand-to-hand from a stable balanced stance without passing, and turn around to return.

Teacher Notes: Setup, Safety & Variations
Equipment: 1 low long balance beam · 2 soft fabric beanbags or small foam balls · Side mats
Setup: Long beam station with clear starting markers and center stop lines 2 feet apart.
Safety: Modern safety adaptation: Children must stop completely at marked stop lines at least 2 feet apart; no passing, pushing, or reaching beyond a stable stance. One child returns before the next turns to prevent crowding.
Make It Easier: Swap beanbags while standing on floor markers before attempting on the low beam.
Make It Harder: After swapping from behind the stop line, step down onto the floor, turn around, and remount to walk back.
Teacher Cue: "Stop at your line, freeze, hand the beanbag gently, step down to turn, and walk home!"
Frequently Asked Questions

Preschool Balance Beam & Gross Motor FAQ

Practical guidance on beam dimensions, floor safety, overcoming hesitation, indoor layout, and Head Start ELOF alignment for early childhood educators.

What are the developmental differences between short and long balance beams?
Short balance beams (approx. 2 feet / 60 cm) are lightweight, modular, and easy to arrange into slalom paths, floor-level stepping layouts, and zigzag lines for agility and balance play (using separate purpose-built foam tunnels for crawling). Long balance beams (8–10 feet / 2.5–3 m) provide unbroken pathways ideal for sustained linear walking, postural alignment, sideways crab walks, and separate-lane partner pacing.
What safety precautions are essential when introducing balance beams to preschoolers?
Use low-profile beams (2 to 6 inches off the floor) set firmly on non-slip surfaces with safety mats along both sides. Maintain adult spotting beside beginner walkers, enforce one child per section on narrow beams, and teach children to step down or land with soft, bent knees if they lose balance.
How can teachers help children who are nervous or afraid of walking on the balance beam?
Follow a step-by-step confidence progression: start with walking on a floor tape line or wide low foam beam, offer a gentle single-finger or hand support, and cue the child to hold "airplane wings" wide while looking forward toward an eye-level target rather than staring straight down.
Are these balance beam activities suitable for indoor classrooms and small spaces?
Yes. Short balance beams can be arranged in compact floor-level Z-shapes or parallel stations only where manufacturer- and facility-required clearance can be maintained. In tighter classrooms, use floor tape lines or wide foam balance paths instead of placing raised beams near walls or furniture. Low floor crawls, straddle walks, and seated balance challenges require minimal vertical clearance and can easily fit on standard classroom rugs.
Which Head Start Early Learning Outcomes Framework (ELOF) goals do these activities support?
These activities offer opportunities to practice skills aligned with the Perceptual, Motor, and Physical Development domain, specifically P-PMP 1 (control, strength, and coordination of large muscles) and P-PMP 2 (using perceptual information to guide body position and balance).
Why does this guide present 38 activities when historical tables mention 39?
The historical source table claimed 39 activities across Chapters 9 & 10 (24 short beam + 15 long beam). In the verified archival records, 38 activities (Activities 9-1 through 9-21, 9-23, 9-24, and 10-1 through 10-15) are fully preserved. Activity 9-22 is not present in the currently preserved archival source, and this verified English edition preserves the 38 authenticated activities without inventing unverified records.
ADVERTISEMENT

Try Next